How the cheat draws vehicles in War Thunder: render passes and visibility colouring
Vehicle highlighting looks like a plain colour fill. In fact the drawing runs three times per frame, and each pass solves a different part of the problem. Here is how it works and why it is built this way.
What it has to achieve
Three things at once: see a vehicle's silhouette through smoke and foliage, tell the visible part from the part behind cover, and still not end up with a flat coloured blob that gives no clue which way the vehicle is facing.
Three requirements, three passes.
Pass one: world depth
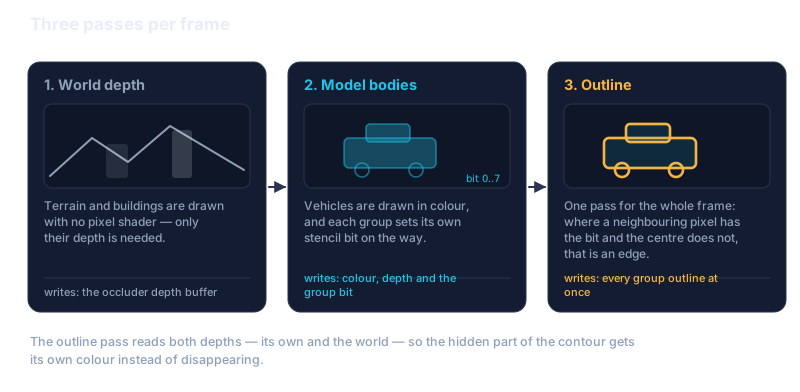
First comes everything that can hide a vehicle: terrain and buildings. They are drawn with no pixel shader at all — only depth is wanted, colour goes nowhere. This is the fastest rasterisation path there is.
Buildings arrive as instances: one geometry, many matrices. The instance matrix comes in on a second vertex stream — three 3×4 rows with translation in w, exactly as the game engine stores them. A thousand identical buildings costs one draw call.
Depth is written in reverse Z: the larger the value, the closer the object. That layout spreads float precision far more evenly across range, which stops being a theoretical point at long distances.
Pass two: model bodies
Now the vehicles themselves. This pass writes colour, depth, and on the way a stencil bit for its group: each highlight group gets one bit out of eight. The write mask is set so a pass touches only its own bit and leaves the others alone.
Why the bit: it is how the third pass finds the silhouette edge — with no need to draw the model a second time scaled up, and no separate mask texture.
Transparent fill is a special case. A visible fragment with nothing to paint it has to be discarded, or it writes depth and cuts holes in the models drawn after it. But discarding it would lose the stencil bit with it, and a transparent model still needs its outline. So with a transparent fill the silhouette is collected in a pass of its own — no colour, no depth, stencil only.
Pass three: the outline
The outline is computed once for the whole frame, for all eight groups at the same time. For each pixel the shader looks at neighbours within the configured thickness: if a neighbour has the group bit set and the centre pixel does not, the centre lies on the silhouette edge and takes that group's colour.
One pass instead of eight is the difference between "it works" and "it costs frames" when fifty vehicles are on screen.
Visible or not: the depth test
The most useful part in practice. For every pixel, pass two compares the model's depth with the world depth from pass one:
model depth < world depth − ε → the pixel is hidden
The epsilon is not decoration: without a small margin, shared faces start shadowing themselves and the model breaks out in speckle.
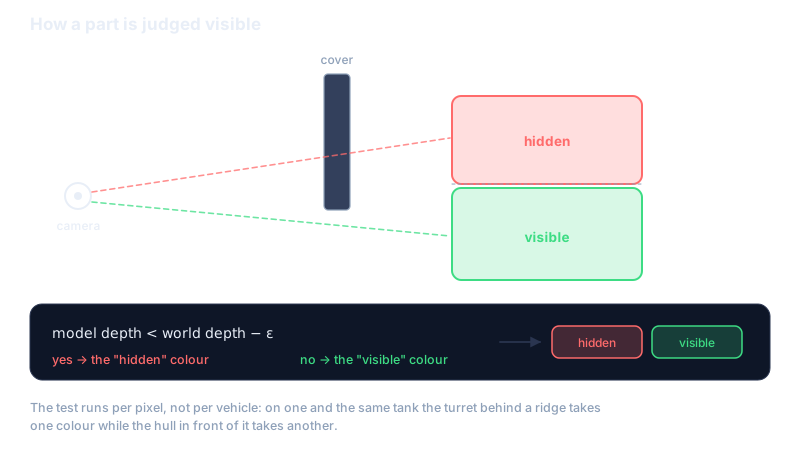
The key point is that the comparison is per pixel, not per vehicle. On one and the same tank, a turret sticking up over a ridge takes one colour while the hull behind the ridge takes another. You see exactly what is actually visible, and the boundary between the colours shows you where the cover runs.
The outline pass reads both depths, so the contour splits the same way: the hidden part of the silhouette gets its own colour instead of disappearing.
Where the volume comes from
A flat fill turns a vehicle into a coloured rectangle. To make facets read you need a normal — and there are no normals in the input data.
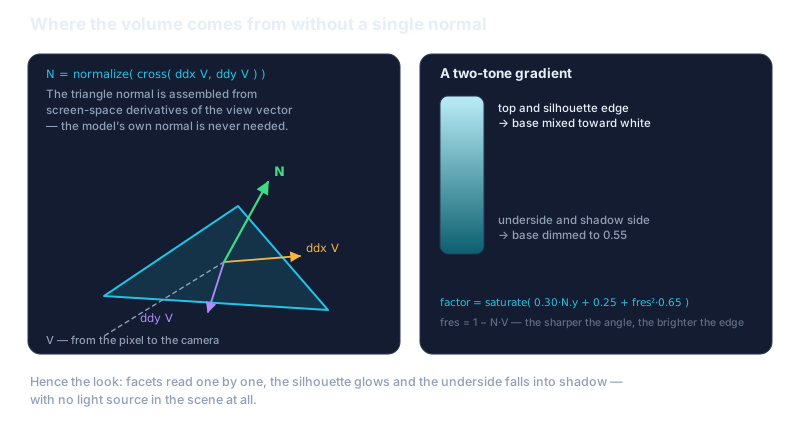
None are needed. The triangle normal is assembled inside the pixel shader from screen-space derivatives of the view vector: the derivative along x and along y give two vectors in the plane of the face, and their cross product is the normal. It is constant across the triangle, which is where the faceted look comes from.
The two-tone gradient
The normal then feeds the tone:
fres   = 1 − N·V
factor = saturate(0.30 · N.y + 0.25 + fres² · 0.65)
The first term separates top from bottom: upward-facing faces come out lighter. The second is a baseline offset. The third is Fresnel: the sharper the angle between normal and view, the brighter — which is what makes the silhouette edge glow.
The resulting factor mixes two tones: the low one is the base colour dimmed to 0.55, the high one is the base colour mixed 0.55 of the way toward white. There is no light source in the scene whatsoever, and the volume still reads.
Underlay: why a depth pre-pass is required
There is a mode where the highlight goes under what is already drawn, so the model shows through as an underlay. That brings a subtlety: with this kind of blending the first fragment to land decides the pixel, and the order of parts within a model is arbitrary. Without preparation the internal geometry would come through — road wheels seen through the hull side.
The answer: first a depth-only pass that keeps the nearest surface, then colour, written where it matches that depth. The same pre-pass collects the silhouette for the outline.
What it buys you
A per-pixel visibility test is not decoration, it is information: you can see at once whether a target can be shot or is sitting behind a ridge, and how much of it is sticking out. Faceted shading preserves the aspect, so which side a vehicle is showing and where the turret is pointing read immediately.
Colours, outline thickness and separate colours for the visible and hidden parts are configured individually — see the War Thunder cheat description. How the lead point is computed is covered in the lead calculation article.
Deep dives on the other games: ballistics in PUBG, projectile speed in Rust, aim smoothing in Apex Legends.